2024. 7. 2. 23:19ㆍSpring-Project
이전글
https://codepracticeroom.tistory.com/207
기상청API를 활용한 나만의 Weather 만들기(2) - 기상청API 데이터 분석
이전글https://codepracticeroom.tistory.com/206 기상청API를 활용한 나만의 Weather 만들기(1)JAVA :17개발 OS : WindowIDE : IntelliJ 기상청 API를 활용하여 날씨 정보를 실시간으로 확인하고 일주일 예상 날씨를
codepracticeroom.tistory.com
개발환경 : Wondow10
IDE : IntelliJ
Java : 17
이전 글에서 기상청 API의 데이터를 분석해 봤다.
이번에는 실전에 적용해 보도록 하겠다.
먼저
https://start.spring.io/ 에 접속하여 SpringBoot 프로젝트를 만들자
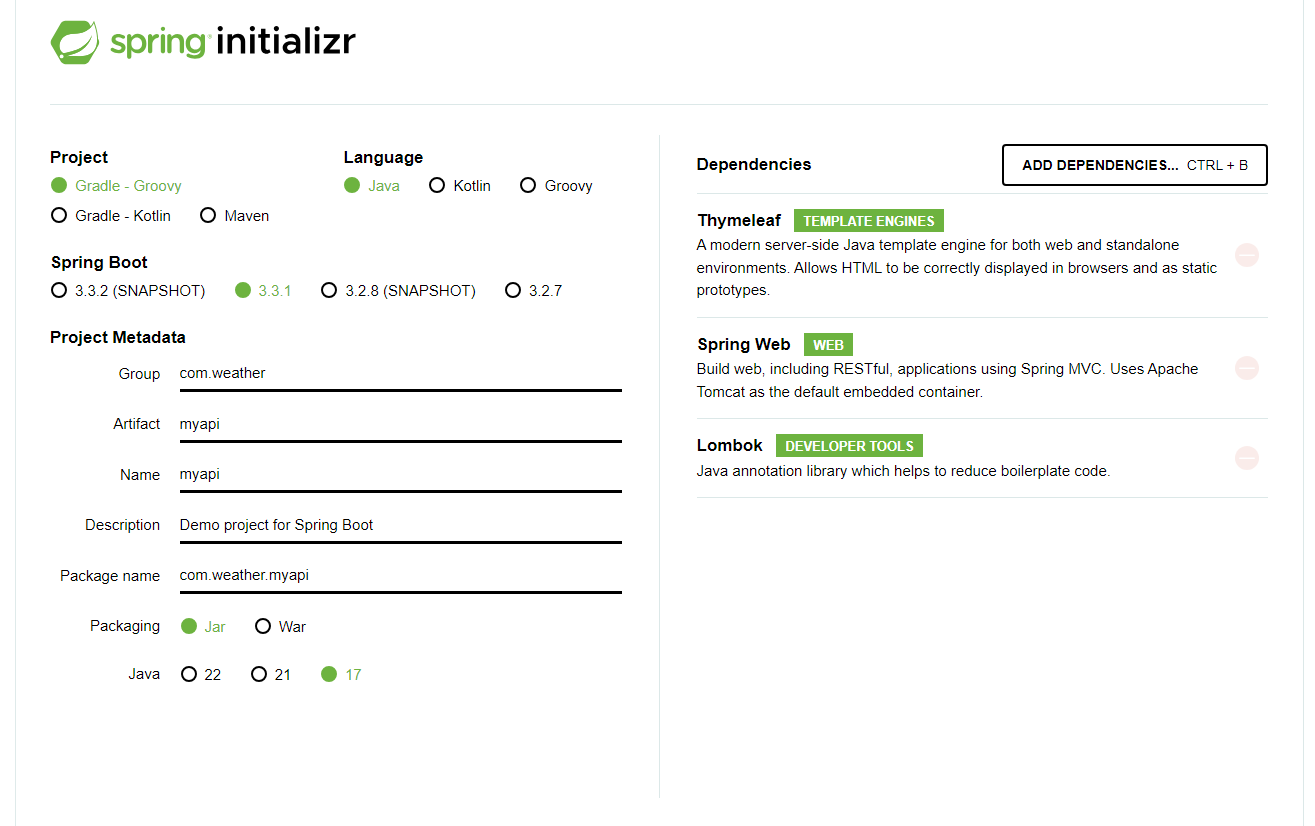
스프링부트 진행 버전은 3.3.1 버전이고 자바 17을 사용하였다.
필요한 의존성은 타임리프, 스프링 웹, 롬복 이 있다.
다운로드한 프로젝트를 실행시킨다.
먼저 기본 도메인 클래스를 만든다.
WeatherSht
package com.weather.myapi;


import lombok.Getter;
import lombok.Setter;
import lombok.ToString;

@Getter
@Setter

public class WeatherSht {

    private String POP;
    private String PTY;
    private String PCP;
    private String REH;
    private String SNO;
    private String SKY;
    private String TMP;
    private String TMN;
    private String TMX;
    private String UUU;
    private String VVV;
    private String WAV;
    private String VEC;
    private String WSD;


    private String fcstDate;    // 예상날자
    private String fcstTime;    // 예상 시간


}
이제 api를 불러올 service를 만들어야 한다.
기상청 API를 활용한 나만의 Weather 만들기(1) 을 보면 기본으로 제공해 주는 예제코드는 너무 길고 복잡하다.
일단 이것을 간단하게 변경해 주겠다.
Service를 만들기 전에 먼저 application.porperties에 Api 링크와 내 ServiceKey를 만들어 준다.
applecation.properties
spring.application.name=myapi

weather.servicekey=내 서비스키

weahter.sht.vilage.url=http://apis.data.go.kr/1360000/VilageFcstInfoService_2.0/getVilageFcst
그 다음에 Service에 urlParam 클래스를 만들어 주었다.
WeatherShtService
package com.weather.myapi;

import org.springframework.beans.factory.annotation.Value;
import org.springframework.stereotype.Service;

import java.io.UnsupportedEncodingException;
import java.net.URLEncoder;

@Service
public class WeatherShtService {

    private final List<WeatherSht> weatherList = new ArrayList<>();

    @Value("${weather.servicekey}")
    private String serviceKey;


    @Value("${weahter.sht.vilage.url}")
    private String shtVilageUrl;


    public String urlParam(String serviceKey) throws UnsupportedEncodingException {

        String urlParams = "?serviceKey=" + URLEncoder.encode(serviceKey, "UTF-8")
                + "&pageNo=1&numOfRows=1000&dataType=JSON&base_date=" + baseDate + "&base_time=" + baseTime + "&nx=64&ny=123";

    }
}
객체를 저장할 List를 만들어 주고
application.porperties에 있는 값을 가져와야 하므로 @Value를 사용하여 properties의 값을 가져온다.
URL Encoder.encode에서 UnsupportedEncodingException 발생하므로 throw를 사용하여 던저주었다.
예외 처리를 하고 싶으면 try catch를 사용해서 예외를 잡으면 된다.
이제 현재 날짜와 시간을 baseDate, baseTime에 넣으면 된다.
기상청 API를 활용한 나만의 Weather 만들기(1)에서도 말했지만 단기예보는
0200, 0500, 0800, 1100, 1400, 1700, 2000, 2300 시간대 데이터만 지원하므로 그 외 시간을 사용하면 안 된다.
그래서 현재 시간이 17시 49분이라면 1700을 넣어주면 된다.
baseDate도 오늘 날짜를 넣어주면 된다.
ex) 24년 7월 2일 -> 20240702
나중에는 자동으로 들어가게 해 줄 것이다.
그 뒤에 &nx=64&ny=123 부분은 기상청 API를 활용한 나만의 Weather 만들기(1) 를 참고해서 자신의 지역을 넣자
이제 요청을 보내서 JSON을 가져오는 클래스를 만들어야 한다.
기본적으로 제공해 주는 예제코드에서 부분적으로만 뽑아서 만들어 주었다.
    public String getWeatherJson(String urlParams, String urlKey) throws IOException {

        URL url = new URL(urlKey + urlParams);
        HttpURLConnection conn = (HttpURLConnection) url.openConnection();
        conn.setRequestMethod("GET");
        conn.setRequestProperty("Content-type", "application/json");

        BufferedReader rd;

        if (conn.getResponseCode() >= 200 && conn.getResponseCode() <= 300) {
            rd = new BufferedReader(new InputStreamReader(conn.getInputStream()));
        } else {
            rd = new BufferedReader(new InputStreamReader(conn.getErrorStream()));
        }
        StringBuilder sb = new StringBuilder();
        String line;
        while ((line = rd.readLine()) != null) {
            sb.append(line);
        }
        return sb.toString();
    }
위 클래스의 리턴값에 JSON 데이터가 나온다.
먼저 데이터가 정상적으로 나오는지 확인한다.
다음과 같이 클래스를 만들어준다.
@Service
...

   @PostConstruct
    public void start() throws IOException {
        String str = getWeatherJson(shtVilageUrl, urlParam(serviceKey));
        System.out.println("str = " + str);
    }
@PostConstruct는 스프링을 시작할 때 객체 생성 후 가장 먼저 실행된다.
그래서 스프링을 시작하면 같이 시작된다고 볼 수 있다.
JSON 데이터
{
"response": {
	"header": {
	"resultCode": "00",
	"resultMsg": "NORMAL_SERVICE"
	},
	"body": {
	"dataType": "JSON",
	"items": {
		"item": [
			{
				"baseDate": "20240702",
				"baseTime": "1700",
				"category": "TMP",
				"fcstDate": "20240702",
				"fcstTime": "1800",
				"fcstValue": "25",
				"nx": "64",
				"ny": "123"
				},
				{
				"baseDate": "20240702",
				"baseTime": "1700",
				"category": "UUU",
				"fcstDate": "20240702",
				"fcstTime": "1800",
				"fcstValue": "-3.9",
				"nx": "64",
				"ny": "123"
				},
				{
				"baseDate": "20240702",
				"baseTime": "1700",
				"category": "VVV",
				"fcstDate": "20240702",
				"fcstTime": "1800",
				"fcstValue": "-2.3",


                ... 중략
Json 데이터는 response - body - items - item 이렇게 나온다.
우리가 사용해야 값은 item 안에 들어있다.
그러므로 밖에 있는 값을 지워야 사용할 수 있다.
여기서 사용하는 것이 SimpleJson이다.
Gradle 기준
dependencies{
	implementation 'com.googlecode.json-simple:json-simple:1.1.1'
}
Gradle에 Simplejson 의존성을 추가해 준다.
이제 Json의 껍질을 하나씩 벗겨야 한다.
    public JSONArray WeatherJsonArray(String response){
        try {
            JSONParser jsonParser = new JSONParser();
            JSONObject jsonObject = (JSONObject) jsonParser.parse(response);
            JSONObject responseObject = (JSONObject) jsonObject.get("response");
            JSONObject bodyObject = (JSONObject) responseObject.get("body");
            JSONObject itemsObject = (JSONObject) bodyObject.get("items");
            return (JSONArray) itemsObject.get("item");
        } catch (ParseException e){
            return null;
        }
    }
1. 첫 줄부터 JSONParser jsonParser = new JSONParser()는 JSON 데이터를 파싱하기 위해 JSONParser 객체를 생성한다.
2. JSONObject jsonObject = (JSONObject) jsonParser.parse(response)는 우리가 위에서 받은 Json문자열을 JsonObject로 변환시킨다.
3. JSONObject responseObject = (JSONObject) jsonObject.get("response")는 JSONObject에서 response 키의 값을 추출하여 responseObject에 저장한다.
4. JSONObject bodyObject = (JSONObject) responseObject.get("body") responseObject에서 body 키의 값을 추출하여 bodyObject에 저장한다.
5. JSONObject itemsObject = (JSONObject) bodyObject.get("items") bodyObject에서 items 키의 값을 추출하여 itemsObject에 저장한다.
6. return (JSONArray) itemsObject.get("item");: itemsObject에서 "item" 키의 값을 JSONArray로 변환하여 반환한다.
위 과정을 모두 거치면 필요한 Json 데이터를 얻을 수 있다.
이제 데이터가 잘 변환되었는지 확인하면 된다.
  @PostConstruct
    public void start() throws IOException {
        String str = getWeatherJson(shtVilageUrl, urlParam(serviceKey));

        JSONArray jsonArray = WeatherJsonArray(str);
        for (Object o : jsonArray) {
            System.out.println("Json = " + o);
        }
    }
결괏값
Json = {"baseDate":"20240702","fcstTime":"1800","fcstValue":"25","nx":64,"ny":123,"category":"TMP","baseTime":"1700","fcstDate":"20240702"}
Json = {"baseDate":"20240702","fcstTime":"1800","fcstValue":"-3.9","nx":64,"ny":123,"category":"UUU","baseTime":"1700","fcstDate":"20240702"}
Json = {"baseDate":"20240702","fcstTime":"1800","fcstValue":"1.6","nx":64,"ny":123,"category":"VVV","baseTime":"1700","fcstDate":"20240702"}
Json = {"baseDate":"20240702","fcstTime":"1800","fcstValue":"112","nx":64,"ny":123,"category":"VEC","baseTime":"1700","fcstDate":"20240702"}
Json = {"baseDate":"20240702","fcstTime":"1800","fcstValue":"4.3","nx":64,"ny":123,"category":"WSD","baseTime":"1700","fcstDate":"20240702"}
Json = {"baseDate":"20240702","fcstTime":"1800","fcstValue":"4","nx":64,"ny":123,"category":"SKY","baseTime":"1700","fcstDate":"20240702"}
Json = {"baseDate":"20240702","fcstTime":"1800","fcstValue":"1","nx":64,"ny":123,"category":"PTY","baseTime":"1700","fcstDate":"20240702"}
Json = {"baseDate":"20240702","fcstTime":"1800","fcstValue":"60","nx":64,"ny":123,"category":"POP","baseTime":"1700","fcstDate":"20240702"}
Json = {"baseDate":"20240702","fcstTime":"1800","fcstValue":"0","nx":64,"ny":123,"category":"WAV","baseTime":"1700","fcstDate":"20240702"}
...생략
이렇게 필요한 데이터가 잘 나오는 것을 확인할 수 있다.
다음에는 이 데이터들을 WeatherSht클래스에 매핑해 볼 것이다.
Service 전체코드
package com.weather.myapi;

import jakarta.annotation.PostConstruct;
import org.json.simple.JSONArray;
import org.json.simple.JSONObject;
import org.json.simple.parser.JSONParser;
import org.json.simple.parser.ParseException;
import org.springframework.beans.factory.annotation.Value;
import org.springframework.stereotype.Component;
import org.springframework.stereotype.Controller;
import org.springframework.stereotype.Service;

import java.io.BufferedReader;
import java.io.IOException;
import java.io.InputStreamReader;
import java.io.UnsupportedEncodingException;
import java.net.HttpURLConnection;
import java.net.URL;
import java.net.URLEncoder;

@Service
public class WeatherShtService {

    @Value("${weather.servicekey}")
    private String serviceKey;


    @Value("${weather.sht.vilage.url}")
    private String shtVilageUrl;

    @PostConstruct
    public void start() throws IOException {
        String str = getWeatherJson(shtVilageUrl, urlParam(serviceKey));

        JSONArray jsonArray = WeatherJsonArray(str);
        for (Object o : jsonArray) {
            System.out.println("Json = " + o);
        }
    }


    public String urlParam(String serviceKey) throws UnsupportedEncodingException {

        return "?serviceKey=" + URLEncoder.encode(serviceKey, "UTF-8")
                + "&pageNo=1&numOfRows=1000&dataType=JSON&base_date=" + "20240702" + "&base_time=" + "1700" + "&nx=64&ny=123";

    }

    public String getWeatherJson(String urlLink, String urlParams) throws IOException {

        URL url = new URL(urlLink + urlParams);
        HttpURLConnection conn = (HttpURLConnection) url.openConnection();
        conn.setRequestMethod("GET");
        conn.setRequestProperty("Content-type", "application/json");

        BufferedReader rd;

        if (conn.getResponseCode() >= 200 && conn.getResponseCode() <= 300) {
            rd = new BufferedReader(new InputStreamReader(conn.getInputStream()));
        } else {
            rd = new BufferedReader(new InputStreamReader(conn.getErrorStream()));
        }
        StringBuilder sb = new StringBuilder();
        String line;
        while ((line = rd.readLine()) != null) {
            sb.append(line);
        }
        return sb.toString();
    }

    public JSONArray WeatherJsonArray(String response){
        try {
            JSONParser jsonParser = new JSONParser();
            JSONObject jsonObject = (JSONObject) jsonParser.parse(response);
            JSONObject responseObject = (JSONObject) jsonObject.get("response");
            JSONObject bodyObject = (JSONObject) responseObject.get("body");
            JSONObject itemsObject = (JSONObject) bodyObject.get("items");
            return (JSONArray) itemsObject.get("item");
        } catch (ParseException e){
            return null;
        }
    }
}
'Spring-Project' 카테고리의 다른 글
| 기상청API를 활용한 나만의 Weather 만들기 X (0) | 2024.11.18 |
|---|---|
| 기상청API를 활용한 나만의 Weather 만들기(4) - service (0) | 2024.07.04 |
| 기상청API를 활용한 나만의 Weather 만들기(2) - 기상청API 데이터 분석 (0) | 2024.06.25 |
| 기상청API를 활용한 나만의 Weather 만들기(1) (0) | 2024.06.24 |
| Arduino와 SpringBoot를 사용한 온습도 측정 사이트(완) - SpringBoot편 (0) | 2024.06.19 |