Arduino와 SpringBoot를 사용한 온습도 측정 사이트(2) - Arduino편

이전글 : https://codepracticeroom.tistory.com/198
이번에는 NodeMCU와 DHT-22를 연결하고 온습도 데이터를 출력한다.
먼저 NodeMCU의 PINMAP은 여기를 참고해 주세요.
https://www.studiopieters.nl/esp8266-node-mcu-pinout/
ESP8266 – NodeMCU PinOut -
For those that starting with the Node MCU ESP modules, I have made some pinout diagrams, their functions and how to use them. The Node MCU ESP8266 12-E chip comes with 30 GPIO pins.
www.studiopieters.nl
3.3V는 + 전압
GND은 - 전압
데이터 핀은 GRIOxxx이다.
여기에서는 GPIO5을 데이터 핀으로 사용할 것이다.
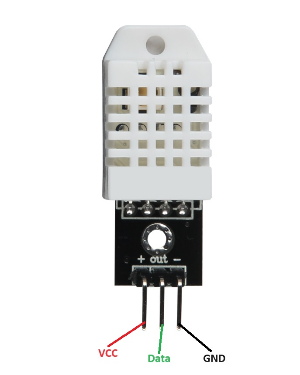
DHT-22
DHT22를 보면 NodeMCU의 3.3v핀은 vcc와 연결
GPIO5핀은 Data와 연결
GND핀은 DHT22의 GND와 연결하면 된다.
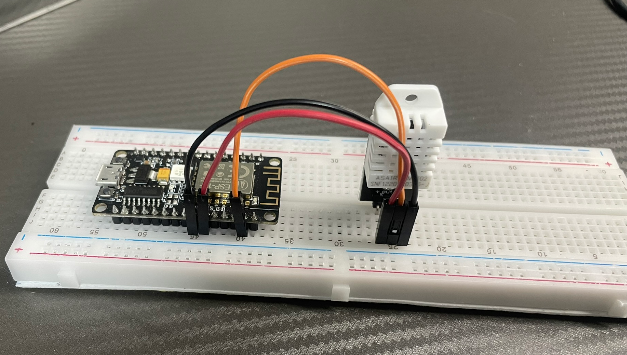
모듈 세팅은 다 했으므로 이제 아두이노 코딩을하면 된다.
먼저 필요한 라이브러리가 있다.
DHT센서 라이브러리와 JSON 라이브러리를 다운 받아야 한다.
왼쪽 상단 Sketch - Include Library - Manage Libaries...
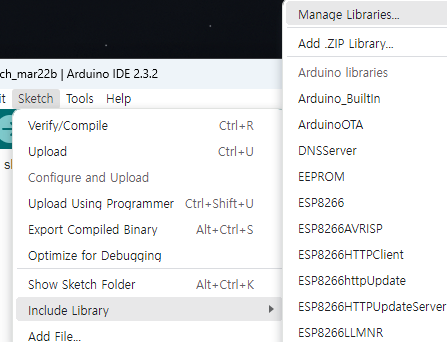
ArduinoJson, DHT sensor library 를 검색해서 Install 한다.
1. 와이파이 연결
먼저 보드에 와이파이를 연결을 위해 와이파이 연결 테스트를 진행한다.
#include <ESP8266WiFi.h>


const char* ssid = "와이파이 이름";		  // 와이파이 이름
const char* password = "와이파이 비밀번호";	// 와이파이 비밀번호

void setup () {

  Serial.begin(115200);
  WiFi.begin(ssid, password);

  while (WiFi.status() != WL_CONNECTED) {

    delay(1000);
    Serial.println("Connecting to WiFi..");

  }
  Serial.println("Connected to the WiFi network");
  Serial.println("IP address: ");
  Serial.println(WiFi.localIP()); // 연결된 WiFi의 IP 주소 출력


}

void loop() {
}
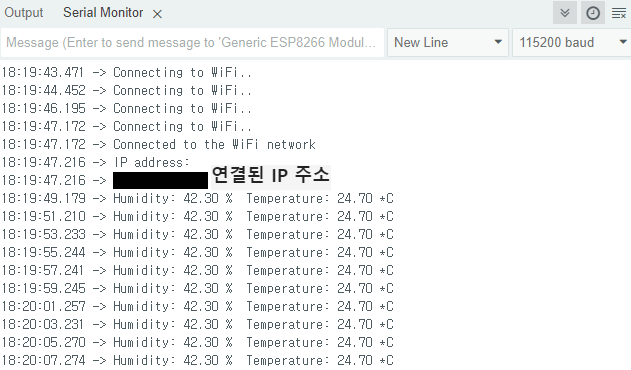
위 코드를 입력 후 업로드 하면 와이파이를 연결한다.
오른쪽 상단 Serial Monitor를 누르면 콘솔창을 볼 수 있다.
와이파이가 연결이 되면 연결된 와이파이의 IP 주소가 출력 되도록 하였다.
만약 글자가 깨진다면 현재 통신속도는 115200으로 설정해놨기 때문에 자신의
Serial Monitor의 통신속도를 확인해 보자 115200으로 설정 안되어 있을 확률이 높다.
2. DHT22 센서 연결
온도는 temperature, 습도는 humidity 로 표현한다.
#include <DHT.h>

#define DHTPIN 5     // DHT22의 DATA 핀을 D5에 연결
#define DHTTYPE DHT22  // DHT 22 (AM2302)

DHT dht(DHTPIN, DHTTYPE);

void setup() {
  Serial.begin(115200);
  delay(10);
  dht.begin();
}

void loop() {
  delay(2000);

  float humidity = dht.readHumidity();
  float temperature = dht.readTemperature();

  Serial.print("Humidity: ");
  Serial.print(humidity);
  Serial.print(" %  ");
  Serial.print("Temperature: ");
  Serial.print(temperature);
  Serial.println(" *C ");
}
위 코드를 업로드 하면 시리얼 모니터에 현재 온습도 상태값이 나온다.
와이파이 연결코드와 DHT22 코드를 합친다.
#include <ESP8266WiFi.h>
#include <DHT.h>

#define DHTPIN 5     // DHT22의 DATA 핀을 D5에 연결
#define DHTTYPE DHT22  // DHT 22 (AM2302)

DHT dht(DHTPIN, DHTTYPE);

const char* ssid = "와이파이 이름";	// 와이파이 이름
const char* password = "와이파이 비밀번호";	// 와이파이 비밀번호
void setup () {

  Serial.begin(115200);
  WiFi.begin(ssid, password);

  while (WiFi.status() != WL_CONNECTED) {

    delay(1000);
    Serial.println("Connecting to WiFi..");

  }
  Serial.println("Connected to the WiFi network");
  Serial.println("IP address: ");
  Serial.println(WiFi.localIP()); // 연결된 WiFi의 IP 주소 출력

  dht.begin();
}

void loop() {
  delay(2000);

  float humidity = dht.readHumidity();
  float temperature = dht.readTemperature();

  Serial.print("Humidity: ");
  Serial.print(humidity);
  Serial.print(" %  ");
  Serial.print("Temperature: ");
  Serial.print(temperature);
  Serial.println(" *C ");
}